:: Diary - April 2020 ::
:: Saturday, April 18, 2020 ::
Just after my last update, the Government declared a lockdown to prevent the spread of Coronavirus. That means essential journeys only (for
food or other essentials, or to get stuff for vulnerable people, for example), 2 metres social distancing, work from home wherever possible,
new laws to enforce all this, etc. None of this would be necessary, of course, if people had been half-sensible, instead of flocking together
to parks and scenic spots in their efforts to stay apart...
Anyway - the result is that casual wee "test runs" etc are now all but banned. The wording of the new law says "essential journeys only" -
it doesn't say what kind of vehicles you can use, so technically, you can go to buy your bog roll, bread and sausages in your 57 Chevy or TVR
or whatever you like. Unfortunately, half of the population, and possibly a greater proportion of the police force, have a somewhat vague
interpretation of "essential" so aren't likely to appreciate you swanning around in fancy motors as they stare longingly out of their sealed
windows. So the Chevy hasn't moved since the middle of March.
The good thing about being stuck at home is that you get the chance to do all of those jobs that you've been putting off for years. I've tidied
my garage, put new felt on the shed roof, scarified, fed and watered the grass, built a new gazebo, and a hundred other wee jobs.
I have also been tiding up the TVR, including the interior and the engine bay, so that now looks better than it ever has.
So today (well, tonight), I'm on to the Chevy, starting with the engine bay.
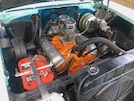
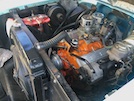 It's not too bad, but a bit grubby. The radiator crossmember needs painting, and the two-tone orange on the engine block and cylinder
heads looks horrible (I used the wrong orange paint when I repainted the heads last year).
So where do we start? Well, we start with the messiest jobs first, don't we? The two heater hoses on the left of the engine bay (beside that
wee heater motor) are caked with something sticky - I thought it was oil before, but normal degreasers haven't shifted it. I brush on some
paraffin, that seems to do the job! Then I spray the inner wings and bulkhead with degreaser, and brush that in, then hose off all the muck.
Then I remove the wee radiator overflow tank so that I can clean it, and the bulkhead behind it.
That's all for today!
:: Sunday, April 19, 2020 ::
Today I decide to do some painting. First task is to get to the bits I want to paint!
I start by removing the valve covers - those are easy, just 4 wing nut type bolts on each side, disconnect the PCV valve, and lift them off.
Then I remove the air cleaners from the tops of the carbs - that's easy too, just 2 wing nuts. I also take off the brake servo vacuum hose.
I loosen the clamp screw holding the coil in place, and pull that out (leaving it connected) and then remove the coil clamp from the top of
the inlet manifold. I also pull out the oil filler tube.
OK - on to the painting. I have some VHT aluminium brush-on paint. I get a wee brush and paint the inlet manifold in aluminium, over the
"wrong orange". That looks much better already.
Then I get some of the "right orange" and repaint the cylinder heads to match the block, between giving the valve covers two coats of the
same bright orange.
Last job for today is to get some black paint and spray over the radiator header tank and the crossmember that holds the radiator in place.
Now that might not sound like much for a day's work, but there was a good few hours in that. Quite a lot of that time was spent looking for
one of the wee air cleaner wing nuts that I dropped down the side of the engine, where it landed on top of the chassis. I could see it but
couldn't reach it, so I crawled underneath, where I could feel it but not grip it. Looking down from above again, now I don't see it any
more. God knows where it has gone! I have metric wing nuts but not 1/4 UNF, so I order another 3.
:: Monday, April 20, 2020 ::
Back to the Chevy's engine bay!
I'm not going to set out in detail exactly what I have done today - but here's a list:
Clean / paint the wee clip that holds the coil on to the inlet manifold then polish and refit the coil;
Paint the silver ribs on the valve covers - this involves using one of those foam brushes and very light quantities of paint;
Touch up the thermostat housing in black;
clean up and paint the black radiator bulkhead;
clean up the wee bracket that holds the radiator bottle to the front bulkhead;
Replace the oil filler tube and cap;
Replace valve covers;
Clean / polish servo, brake pipes and proportion valve, then clean and replace servo hose;
Polish and refit the air cleaners;
Dress all the hoses & cables.
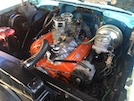
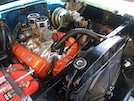 Here's where we are so far - it looks pretty good I think. I've just noticed when preparing these photos that I need to tidy
up the carb bases though!
:: Wednesday, April 22, 2020 ::
After a day off yesterday to fit a new loft hatch and ladder (in the house, not the car) it's back to the Chevy.
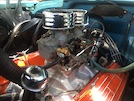 First job is to get a wee brush and paint the bases of the carburettors black, like they should be.
Then I decide to start it, just, well, to start it. It has been a right bitch to start lately, even with a jump start, and today
is no exception. It does go eventually though, but settles at quite a high idle. It was doing this a while ago, and I can't
remember why... I realise that the throttle isn't closing properly, and after a bit of fiddling, I discover that the linkage is
loose on the front carb spindle. Again! That means that when the linkage is pulled back to "idle" by the return spring, the throttle
butterfly is still slightly open. The car is trying to start on one carburettor!
I disconnect the linkage and check that both butterflies are closed, then reconnect and tighten the grub screws on the spindle.
Better!
The last thing is that the underside of the bonnet is covered with flame retardant foil on felt, and it's falling to bits above
the engine itself. I'll have to decide whether to replace it (and what with) or just scrape it off (which I would have to do anyway
if I'm replacing it).
:: Friday, April 24, 2020 ::
Right, after two days of focussed deliberations and on-line research, I've reached the conclusion that I have two choices when it
comes to the under bonnet insulation. I can scrape it off and cover it with something else, or scrape it off and leave it. In
either case the first step is - scrape it off!
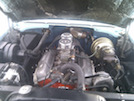 I forgot to take a "before" photo, but here's one I took when I first bought the car. You can see the big hole in the foil surface
right in the centre. What you can't see is that it's sagging down from the centre of the bonnet as well.
So I start by opening the bonnet and putting a double dust sheet across the top of the engine to prevent all of this shit from dropping
all over it as it falls apart.
Then I lift one edge and just start ripping it off. It's not foam, its a thick felt, but it mostly comes off in one piece, leaving
clumps stuck to the bonnet.
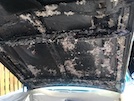 This is it after ripping it off, and picking off most of the felt clumps - the bits that are left are well stuck down!
I have half a wee tin of adhesive remover, so I pour a drop of that into a wee pot, and brush it on to a small area, wait a minute or
so, then scrape it off with a plastic scraper. That works well, and lets me finish the front bit (in front of that we strengthening
rib that you see) before the tin is empty.
I decide to order more remover, but discover that it's around £6 for a 250ml tin. That's £24 a litre, and delivery takes a few days.
I decide to try petrol, just to see if it works - and it does, it works well! And it's only £1.35 or something a litre, and I have an
emergency can in the boot! No-brainer.
I work my way slowly (painfully slowly) along all of the stuck-on bits, to dissolve all of the adhesive back to the bonnet, which seems
to be painted (or maybe undersealed?) under the felt. The petrol doesn't dissolve it though so I don't think its underseal.
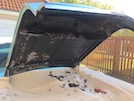 After several hours, I've done all of the front bit and one half of the back bit. It's hard work, but it looks good - certainly a lot
better than tattered heat shield!
That's all I get done before tea-time, and I sill haven't decided if I'm going to re-cover it or not. If I am, then I'll look for a black
material rather than heat shield, which I don't think looks right, but might be necessary for heat protection (although I doubt it...).
Oh, one last thing - this flame-retardant material I took off. I decide to see just how it works.
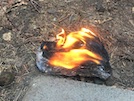 It doesn't. As soon as I wave a flame in its general direction, it goes up like a torch Whatever I decide to do with the underside of
the bonnet, it's going to be safer than that stuff!
:: Saturday, April 25, 2020 ::
Another day spent dissolving glue with neat petrol. It comes off well though, without damaging the black finish underneath.
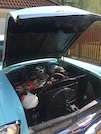 I think it looks just fine as it is, certainly better than being covered in disintegrating tinfoil, so I'm just going to leave it like that for
now. If it's too noisy or the hood gets too warm, I'll think about what I do then.

 It's not too bad, but a bit grubby. The radiator crossmember needs painting, and the two-tone orange on the engine block and cylinder
heads looks horrible (I used the wrong orange paint when I repainted the heads last year).


