Well, kiddies - it has been a long winter, and I don’t think it’s over yet!
Over the end of last year, I reached the conclusion that either my waterproof cover isn’t waterproof at all, or it has been trapping water or condensation under it. Either way, it wasn’t doing the paint any good at all. I have to take the cover off in high winds, to it flails about and batters hell out if the paint that way too.
Between that, and the continuous rain, storms, snow and hurricanes, I haven’t had a cover on the car since the new year.
The downside if that is that the carpet in the drivers footwell gets wet, and I don’t know why.
So, I decided to try a wee test. I sprayed soapy water all around the windscreen, and then fired up the air compressor, and blew it around the windscreen seal from the inside. The water bubbled up above the driver side (where I’ve seen water running down the inside when I’m driving in rain) and for a short bit above the passenger side (where rainwater drips on the dash when moving). The biggest leak seems to be the edge and bottom corner of the driver side.
I don’t want to use silicone, so I bought some rubber sealer and squeezed it in, between the seal and the glass, all the way round. I’ll have to see if that works.
Then, I decided to clean the car - it was covered in muck, dead leaves, pine needles and lots of green algae. A good wash removes all of that!
While I’m doing the door shuts, I noticed that water was running down the a-pillar past the door hinges on the driver side - but it was going diagonally into a channel alongside the door seal and running down into the seal at the sill. As I’m cleaning the door shuts, I discovered a wee rubber seal in the top of the door, in front of the quarterlights, that is loose, and wet underneath. I dry it off, and then glue it back in place. I think it’s supposed to catch and divert any water running down the a-pillar out of the car.
I also go round and clean up all the chrome trim - that’s a task in itself!
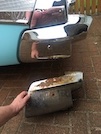
Today, I’m going to tackle one job that I’ve been putting off for ages. The rear bumper is in three sections, and the left-hand end (driver side) is really rusty. Don’t know why it’s so bad when the rest is ok, but it is!
I bought a new part from the USA over a year ago, but I haven’t got around to fitting it, partly because you have to take the whole rear bumper off, and it weighs about the same as a Mini, so I need a wee helper. But mainly because I couldn’t be arsed.
Today, though, my current best mate Dave has volunteered to help. I start by jacking the car up and putting axle stands under the back of the chassis, then I lift the boot mat and unplug the license plate lamp, and push the wire through the body
Then I unclip the cable ties holding the the reverse lamp wiring to the chassis, and unplug the connections.
This is where it all gets heavy-duty. We take off the bumper bolts on the chassis. There are 3 on each side - the rear one is easy to get to, the front one is ok with a socket through a hole in the chassis, but the middle one is more of a pain.
We get all six out, though, and slide the bumper out the back of the car.
With the bumper on the ground on a bit of carpet, we remove the coach bolt holding a bracket to the end of the bumper, and then three smaller bolts holding the bumper end on to the centre section.
With the old bumper end on the bench, we remove another bracket from inside it, and then remove the reversing lamp - that has 2 screws holding the glass on, and then another 2 screws holding the lamp into a wee holder, that we then unclip from the old bumper and install in the new one. Then we refit the lamp and glass, and that’s it ready for reassembly!
We put the bumper end on the centre section, and fit the bolts not too tightly. Then we belt it a few times with a rubber banner till everything lines up, and then refit the end bracket with the coach bolt.
There’s a long rubber seal between the bumper and the body, which has partly detached itself (although it’s still in good nick!). It clips into a groove along the rear body edge, so we open up the tangs slightly, push in the rubber, and close up the tangs with gland pliers.
Right - here we go. Time to refit the bumper! Pick up an end each and slide it into place, making sure that we don’t catch any of the wiring. There are two more rubber seals under the tail lights that have to fit inside the bumper, so those have to be guided in with one hand while sliding the bumper into place with the other.
We get the holes in the chassis lined up and push all the bolts through first, to hold the bumper in place, then we replace the washers and nuts, and lift the bumper into alignment while tightening them.
Then it’s just a matter of re-routing and re-connecting the number plate lamp and the reverse lights, and it’s done!
 Noticeable difference between old and new!
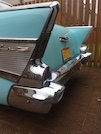
 And here’s the new bit all in place!
It looks fantastic!
