:: Diary - March 2022 ::
:: Thursday, 3 March, 2022 ::
Well, for one reason or another, February passed in a blur, so I haven't been along to the car until a coupe of days ago. On Tuesday,
I gave the windscreen scuttle a bit of a rub down and a couple of coats of brush-on primer (nice and thick!)
Left that to dry for a day and went back and rubbed it down yesterday. I used some knifing stopper to fill a few wee imperfections and
sanded that down smooth after it had dried.
While the stopper was drying, I decided to look at the rear passenger door. No, not just staring at it, it has two big paint blisters
above the side trim. I scrape off the loose paint and then sand both bits down ready for painting.
Then I mask off the scuttle and that bit of the door (which is a very short sentence but takes a looooong time), and spray on a coat
of primer to see how smooth it really is.
Back today to give that primer a wee rub down with fine wet and dry paper, leave it to dry and then spray on another couple of light
coats of primer.
 Here's one side of the windscreen scuttle....
 and here's the other side.
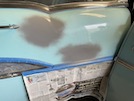 And here's the two repairs to that rear door. I think that I might rub down and repaint that whole panel so that it doesn't look too
patchy.
Meanwhile, I've heard that the new headlining is almost ready, so they are about to arrange shipping. Time to start practicing (or
at least, watch some youtube videos) before it arrives!
:: Friday, 11 March, 2022 ::
Progress on the Chevy has been slow, partly because I’ve had limited chances to visit the farm.
Mainly though, it’s a combination of the state of the existing paint that’s on it, and my lack of skill in prep - no matter how smooth
I think the patches in the rear door are, the edge of the repair always shows when I add primer. I think I’ve figured out the problem
though - I’ve been wiping it with a solvent as a “panel prep” and I think that’s reacting with the edge of the old paint, and slightly
bubbling the primer round the edge.
There are also a few pits in the old paint, so yesterday, I added a tiny bit of knifing stopper and left it to dry, then ordered some
isopropyl alcohol wipes to use before painting.
I also painted the windscreen scuttle. All was going well, it looked like a pretty good match after the first 2 coats, that finished
off the last of that aerosol tin.
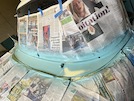
 I opened a new tin of exactly the same paint for the third coat, and it’s almost a different colour… what a pain in the arse!
Today I rubbed the back door down again, and it’s much smoother. I’m not going to paint it yet though because I want to strip the door
first (handles and side trims).
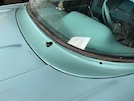 Back to the scuttle and remove all the masking. Decent finish but terrible paint match.
Here's an extract from the 1957 Chevy Belair brochure, showing available paint colours. My car is supposed to be Larkspur Blue (top
right) and the second tin of paint was pretty close. The first time I bought (from the same place) was a wee touch greener, but not
too bad if you were doing a whole panel. This third tin is a lot greener, almost the colour below - Surf Green... very mysterious.
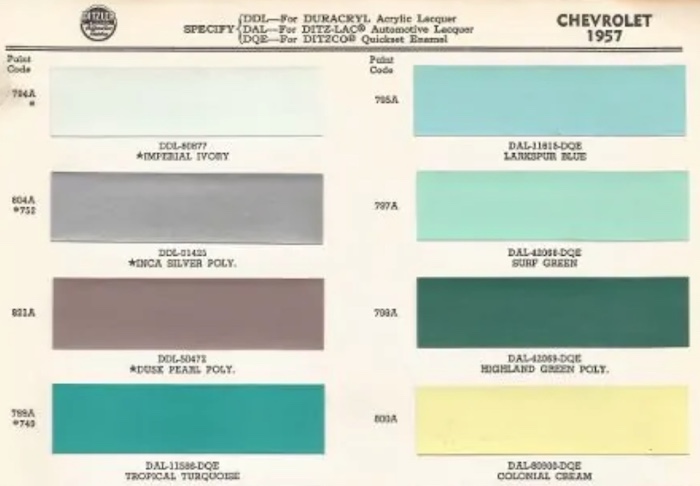
I think I need to keep some of the paint chips that I have, and try to get a colour mixed to those. The struggle is real...
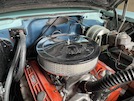 Bugger it, that’s enough painting… I decide to tidy up the engine bay wiring a bit - the wires for the new carb’s autochoke are all
over the place. Looks a bit tidier when it’s all tucked into a plastic tube! It'll look even tidier once I've cleaned off all that
sanding dust!
Weeks ago, I discovered that the distributor was loose, so I reset it roughly, but today I decide to start the car and reset it properly.
I loosen the distributor, then a wee jump start and it’s going! It’s lumpy but it’s going! I advance the timing a wee bit till the revs
are highest, and then retard it a touch and leave it to warm up.
When it’s warm, I stop it and connect up my trusty old timing light. Its around 16 degrees advanced, so I retard it to around 12 degrees
and tighten the dizzy clamp bolt.
Next time:
fit the stainless windscreen trim;
Take the back door to bits to remove the door handle and trim;
Rub down the back door till it’s properly smooth.
Then I need to think how I’m going to paint it so that it looks almost the same colour… I’ve ordered 3 tins at different times, all from
the same place using the same paint code, but 3 different colours, and only one of them matched.
:: Sunday, 13 March, 2022 ::
 Here's a photo of a (very large) flake of the old paint off the door, laid on top of a bit that I sprayed from my "matching" paint tin.
There are some minor shade variations, I think you'll agree...
Had a trip to Halfords today to have a look for a shade of blue that matches the paint chips I have. This when I noticed that even
although it looks "blue" in comparison with the new paint, it still has a greeny duck-egg tint to it, compared with the light blues
available.
So instead of worrying too much about that, I decide to look at another couple of things. First, when I brought the car along to the
garage, one of the rear brakes was sticking as I left my street. It had cleared itself by the time I got to the farm, but I decide to
check it anyway. I jack the back of the car up and move it into neutral. Both wheels seem to be turning pretty freely.
Next, I decide to strip the back door ready for painting. The first job is to remove the window and door handles. The handles are held
on with a wee horseshoe clip, and there's a special tool you can buy to get it off. My method is to push a bit cloth between the
handle and the door trim and pull it side-to-side until the clip pops off. Then you just pull the handle off the splines.
Next, remove 2 screws to remove the armrest, and then another 2 screws to remove the armrest bracket from the door.
Then remove 6 screws that hold on the inside window trim.
Now the door trim just pulls off the door, although it's held on with wee tacks and you need to lever them out with a plastic trim tool.
Then there's a plate in the door that's held in with 5 screws.
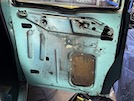 That gets you to here...
Then the chrome trims on the door are held on with wee nuts that you can (just) reach, with a wee 3/8 socket.
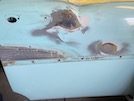 With the chrome trims off, the door looks like this.
Here's a thing. Look at the shade of blue in that picture - that's the outside of the car. Now look at the shade of turquoise-blue in the
last picture, inside the door... it's totally different! What's more, that "hidden" colour pretty much matches the paint in the tin.
Either the outside of the car has been painted a slightly dfferent colour at some time, but not all the door shuts etc, or the outside
has faded in the California sun. Either way, I'm not going to get a match from a paint code!
:: Wednesday, 16 March, 2022 ::
I've spent the last 3 days thinking about this paint colour, and how I'm going to get a better match, without respraying the whole car.
On Monday, I visited a bodyshop (a car bodyshop, not one of those gym things, oh no...) for a bit of advice. He was ok, I suppose, but
he doesn't have a spectrophotometer thingy that can read paint colours, so I wasn't a lot further forward.
Then by coincidence, I saw an advert for Chips Away - now they must be able to match paint eh? So I pop into their local depot and again
the guy is pretty helpful, although he says that they need a bigger sample to get a proper reading.
There's nothing on the outside that's easily removable, without taking in a whole door. However, the inside of the car, including the
dash and steering wheel, is (or was!) painted the same colour of the outside, so that might be a start. So today, I take off the glove
box lid, just 3 screws on the hige plus 2 on the side bracket...
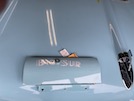 Here's a photo of the glove box lid on the car bonnet, near the garage door in natural light...
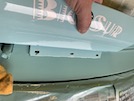 And here it is on the windscreen valance that I just painted - but further inside the garage.
It's a pain in the arse that it looks like two different colours under different lighting conditions. Nevertheless, if I can get paint
to match that glove box lid, it should be pretty close to the rest of the car.
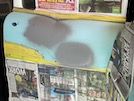 While I'm here, I give the door a clean with an alcohol medical wipe, and spray on a couple of coats of primer. It's looking much better,
although there are a couple of pitted bits that need a wee bit more knifing stopper.
Then I go back to Chips Away with the glove box lid. He scans it and says that the closest code he can find is a Nissan pale blue. It's
close, but still a bit too "blue". He asks me to leave it with him and he'll have a better look when he gets a minute.
When I go back later, he says that he's cleaned up the lid and the closest match he can find is a colour called "Verde St Tropez" which
is listed as paint code 6003 under a manufacturer called "LML." He doesn't know who LML are and neither do I. Neither does his mate in
the bigger bodyshop across the road.
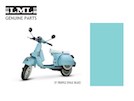 Well, a bit of research later shows that LML are a company in India who are still making Piaggio Vespa scooters, and one of their available
colours seems to be a match for a 1957 Chevrolet that has been resprayed or faded...
The good news is that the "mate across the road" can make aerosols in any colour you want. I want that one! It's worth a try with a local
supplier, eh?
:: Friday, 18 March, 2022 ::
What
A
Feckin'
Disaster!
I spent a wee while yesterday on the door, just filling in the last pinholes etc and rubbing it down smooth. I didn't have enough primer
left to cover the whole panel, so I left it until I could buy some more.
Well today, I bought more... so I resprayed that whole door panel and it's as smooth as a very smooth thing. I forgot to photograph it
though.
Then I thought to myself "I think I'll prime that windcreen scuttle again before I repaint it." So I gave it a rub down, and sprayed on
some fresh primer.
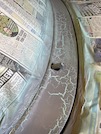 Oh dear. That didn't go well at all. The new primer has reacted with that top coat. While the resulting blue crocodile look is lovely, it's
not quite the finish I was after. It's not drying either, it's just turning the blue paint to glue...
Two hours of joy ensue, while I scrape off the crocodile effect and then clean the panel with acetone - which obviously removes even more
of the underlying layers... I also end up with hands like a smurf.
Feck feck and thrice feck.
So that will all need rubbed down and primed again, before top-coating (when I get the new paint).
Did I mention "Feck"?
:: Tuesday, 22 March, 2022 ::
I really should be getting on with the Chevy, but I’m a bit discouraged by the problems getting matching paint. The guy from Thursday
hasn’t come back to me yet.
On a brighter note, the new headlining has been despatched from Michigan and has reached the FedEx hub in Indianapolis, and is due for
delivery next Monday. That might kick my arse back into gear…
I need to rub down that windscreen scuttle (again) and prime it ready for painting (again), and hope that it doesn't get contaminated
(again).
:: Wednesday, 23 March, 2022 ::
Well after nearly a week of doing not very much at all to this car, I finally donned my big boy pants and returned to the farm and this
windscreen scuttle.
I spent ages rubbing it down with rough, then finer, grades of wet and dry paper, until it was as smooth as I could get it - multi-coloured,
but smooth!
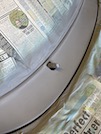 This is a vast improvement! There's a wee tiny contamination right at one end, which would be covered by the windscreen chrome trim, and
another round one of the wiper holes that would be covered by the escutcheon, but I'll rub them down and fix them anyway.
So that's me back to where I was with this bit, 3 weeks ago - although overall I think that all that extra rubbing down has left it smoother
than it looked the first time. Now all that I can o is hope that the colour coat (whatever colour that turns out to be!) doesn't crinkle it
all off again!
In other news, the headlining has been despatched from Michigan to Indianapolis and is current mid-flight over the Atlantic, due for
delivery on Monday! I was hoping to be further on with these other repairs by this time, but hopefully I;'ll soon be able to start putting
things back together!
:: Wednesday, 30 March, 2022 ::
Progress so far...
On Friday, I went back to the guy who is supposed to be ordering paint for me. He hasn't done it yet... I have to be nice though because he
still has my glove box lid.
I find a place online that sells motorbike and scooter paint, and they appear to do this particular code - so I order a can of basecoat, and
some lacquer.
The headlining arrived on Monday, just as planned. I'm not quite ready for it yet though, because all this painting has taken me around 20
times longer than I thought it would...
Anyway, the paint arrived yesterday, so in a new burst of fresh enthusiasm, dredged from the depths of pale blue despair, I rubbed down the
two wee contaminated bits on the scuttle, and gave them another couple of coats of primer. Much better!
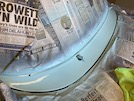 Today, I get back to the car and give it a wee wipe down and then a couple of coats of basecoat - and the colour match isn't too bad!
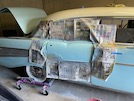 The first spray was a wee bit scary though, because it goes on almost white. Squeaky bum time! I give the can a few more rattles just in case
it hasn't mixed properly, but while I'm doing that, the first spray changes colour before my eyes, and looks pretty close. YOu can't tell until
you take all the masking off, of course, but it looks ok.
Then I faff about cleaning the whitewall tyres and taking the boot emblem off, because the centr bit has detached itself from the surround.
By the time I've done that, the paint has dried enough to give it a couple of coats of lacquer. I'm going to give it another couple of coats
so that there's plenty to rub down and polish in a couple of days.
 Here's one side of the windscreen scuttle....
 And here's the two repairs to that rear door. I think that I might rub down and repaint that whole panel so that it doesn't look too
patchy.


