:: Diary - April 2022 ::
:: Tuesday 19 April, 2022 ::
I’ve been busy since the start of the month, partly with work, partly with the garden and partly with the TVR, which I spent 3 days
driving 670 miles to England and back for a car club event. I spent at least the same amount of time beforehand, just getting it ready!
I also spent another 3-day weekend going to a wedding in Yorkshire, and the remaining weekend so far this month, sitting on, or
leaning over, the bog.
As a result, the time available for putting the Chevy back together has been somewhat limited! I've also been a wee bit discouraged, to
be honest, because the paint on the scuttle has crinkled on one side, probably because it was just too think. It needs o be all rubbed
back again, but I can't be bothered at the moment, mainly because there's no point in repainting it with paint that doesn't quite match
that most faded bit of the car. I think that I'll put the car back together, give it a T-cut or similar to see if that helps bring back
the fading and then get the outside of the car scanned, and try to get a better colour match.
However, I managed to repair the boot emblem, and put that back on.
I also refitted the glove box one day, just for therapy.
So today, I got on to fitting the windscreen stainless trim.
First bits are the bottom corners, that slide up onto the side trims (although “slide” underestimates the frustration of trying to get
those bits together), then screws through a bracket into the scuttle, and into the rear of the windscreen frame.
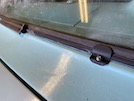 Then there are two clips that screw into the scuttle.
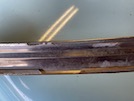 Each bit of trim slides onto those clips, and has a wee break in the slider that allows it to clip over.
I put a bit of tape on the front so that I can see where it clips on, and also a wee bit on the windscreen so that I can line them up.
Then I use a hammer on a bit of wood to knock the centre of the trim outwards so that it slides along the clip, round the bottom of the
windscreen and into the corner piece. At the same time, there’s a stud that goes down through the scuttle in front of the windscreen
corner. Again, that sounds a lot easier than it is because you need 5 eyes and 5 hands to see everything you’re doing.
Then I do the same on the other side.
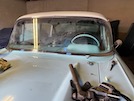 This photo shows how far each bit of trim has to slide - the masking tape lines up where it clips on, then it has to be slid out and
round into position.
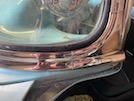 So that it fits under the corner moulding.
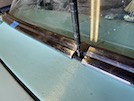 There’s a longer clip that fits in the centre. I slide that into one side, push them both into position, then the slide the clip back to
join them. Then the whole lot screws through the clip into the scuttle.
When that’s all in place, I put the wee nut onto the stud up behind the dash on each side.
Finally, there’s a wee centre piece that then clips over the gap.
:: Thursday 21 April, 2022 ::
Right, I want to get on and get these bits finished and get the car back together so that I can install the new headlining. So today,
I'm going to finish the windscreen trim by reassembling the wipers, and then put the rear door trims back on.
The wipers start with the escutcheons. I had those sealed with silicone before, but I decide to make a thick gasket out of neoprene sheet
material that I cut those to shape and stick them to the underside of the escutcheon, and put them on, and then tighten the chrome nut
just enough to compress everything into place. Then it's just a case of aligning the wiper and pushing it on to the spindle.
On to the rear door. First I fit the door handle, which pushes on to the door and is held in place with two threaded setscrews that are
tightened through holes in the inner door skin.
Then the door trims, which are held on by bolts that go through the door, with nuts on the inside. First the top curved trim, since
that has a wee "tail" that fits under the waist trim. Push it through and then fit the nuts through the door aperture. It's fiddly but
not impossible!
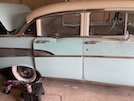 Don't tighten it up yet, until you fit the bottom trim - again held on with nuts that you can reach through the door aperture, plus one
at each end on the edge of the door. Line up the trims and then tighten all the nuts.
The paint match still isn't too great - it matches the interior perfectly but not the faded paint outside. I'll have to get the outside
of the car scanned and get a matching paint again! Or, get the whole car resprayed, but that's a job for another day. Maybe.
Anyway, on with getting this back together. I refit the planking plate on the inner door skin, and then refit the door card - it just hooks
over a wee rail at the bottom and then punches into place around the edges. Then refit the armrest bracket and then the armrest.
Last, is refitting the inside door handle and window winder. I find that the best method is to refit the circlip to the handle, then put
the handle on to the splines in the right position, and thump it with your hand. Other moor fiddly options are available.
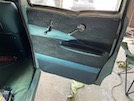 Ta-daaa!
Then I refit the inside window trim - it clips into place and is held with 6 screws.
That's all I'm going to do today. I'm ready to refit the headlining - well the car is ready, I'm not so sure about me - but it's too dark
in the garage to see what you're doing, without moving lights around al the time. The weather forecast is good for the next week or so,
so I'm going to take the car back to the house where I can fit it outside, and where all my tools are in case I have to deal with tricky
bits (and also where I can go and cry when it all goes wrong...).
:: Monday 25 April, 2022 ::
I brought the car back to the house on Saturday, after the usual shuffle to get it out of the shed.
So today, it's headlining day! I haven't done this before, so aside from watching a few youtube videos, I don't have a clue what I am
doing. Nothing new there...
I should also apologise that I got so engrossed in focussing on what I was doing, that I forgot to take enough photos.
Before you start refitting it to the car, refit all of the wire bows into the listings - the wee cloth tubes that are sewn into the seams
of the headlining. I clean them all first so that they slide in more easily. When I took them out, I tagged them all with numbers along
their left-hand ends, so that I can put them all back in exactly the same order, and the same way round.
There are 7 bows, and 6 of them fit into holes along the sides. The 3rd one from the front doesn't, it just fits onto wee "tangs" along
the front of the roof beam in front of the interior light.
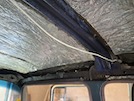 You can just see those wee tangs in this photo from earlier.
The first step is to hang the whole headlining fro that 3rd bow. Starting from the middle outwards, you fit the wire over the tang, and
then push the tang through the listing. When it's fitted to all the tangs, you knock them up gently to hold that first bow in place.
This is where I made my first (and only obvious) mistake. I'll come back and explain that later...
Then working backwards from the middle, you fit each bow in place in the holes in the side rails, in either the top or bottom holes.
All of mine were in the bottom holes when I too them off, so that's where I put them back. A few experiments show that they don't fit
in the top holes even if I try.
When you reach the back window, there are two bits of card sewn into the ends, that tuck up into tangs above the bak window, and are
then covered by the back window rubber seal.
Then fit the two front bows to the side rails...
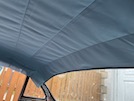 And that gets you to here at the back...
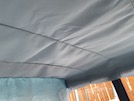 and here at the front. The bit hanging down has to be stretched forward evenly, and stapled into tack strips along the top of the windscreen.
So, this is where it gets serious, and past the point to no return...
I stretch forward the centre bit, which pulls all of the front bows forward, and put in a staple into the tack strip, either side of the
centre, then I stretch the rest outwards and forwards, and put in another couple of staples a couple of inches or so from those first ones.
That has pulled out quite a few of the wrinkles along the centra of the car.
Then I go back to that centre bow, and stretch out the material towards the door pillar, pulling it outwards and tucking the edge up under
the serrated edge strip. Then the same on the other side.
Then I work backwards along each side, one bow at a time, pulling the material out and sliding it along the bow while I tension the edge.
The listings are deliberately made too long, but don't fit between the bow and the roof rail, so I have to slip my scissors up the side of
the bow and snip the listings so that I can pull the lining down tight enough before I tuck the edge up.
Once it's approximately in place, I can tuck more material up each side a bit at a time, to add more tension and take out any wrinkles.
Then I can work from the centre toward the front bow, the same way, but also tensioning towards the windscreen and adding more staples from
the centre outwards, until I reach the corners of the screen. Those will eventually be covered by the inside windscreen trims, but I want
to get them as tidy as possible.
I also use a steamer to add a wee bit of steam to take out any creases where the headlining was folded for delivery. Then I tick all of
the edges up into the grippy strips.
Finally, I add more staples along the top of the screen to fill in the gaps between my "fitting staples" and hold everything in place evenly.
Then I use my scissors to trim the excess off, along the top of the windscreen.
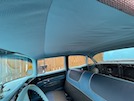 And here we are!
Right, back to that "first mistake" that I talked about. The "3rd bow" that I talked about, between the door pillars, is the only one that
fixed directly to the roof, through the listing material. That doesn't let the material slide along the bow, like the other ones, so it's a
lot harder to get the wrinkles out. The youtube videos didn't mention pulling the listing to pre-tension it as you're pushing it onto the
tangs, but it's obvious, when you watch them again, that they are doing that. I didn't pick that up, so now I can't get those wrinkles out
along that bow, without repositioning the listing on those tangs. That means taking the whole thing out, at risk of tearing the edges where
they are tucked up, or ripping through the staples, and starting again...
So - it's staying as it is.
Next step is to put back the trims around the windscreen. I had started to do that by the time I took that last photo, but the first bits
to go on are the bits on the windscreen pillars, held on by 4 screws each. I get the screws in place (again very fiddly) but leave them loose
so that I can slide the ends of the two top trims under. Then I tuck the interior mirror bracket in place under the other end of those strips,
and screw those in place, then tighten up all the rest of the screws.
Next, the interior light or dome light. I feel through the cloth for the hole where it mounts, and use a sharp blade to cut a slit the length
of the circle bit. Then I connect up the wires and hold the light in place, extending that slit forwards until the lamp connector fits above
it without pulling the material. Then I use the blade again to cut through the cloth to expose the 3 tangs around the perimeter. After a wee
check to make sure that the light works with the battery connected, I push the light into place over the tangs, and twist them to hold it in
place. Then I refit the chrome trim and lamp cover.
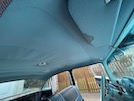 Then I refit the sun visors, and that's it!
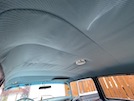 I would be happier without those wrinkles along the length of the 3rd bow, but there we are.
:: Thursday 28 April, 2022 ::
Last few steps... I nip along to the farm to bring back the parcel shelf and the two bits of the rear seat.
When I go to fit it, I can't get the back door open - the wee knob is stuck and won't lift, Eventually, after a bit of jiggling and bumping and
swearing, the handle works and the door opens.
I had better sort that first eh? So i remove the window frame, dr and window handles, armrest and the door car, and discover that the wee knob is
connected to a wire that goes to the door lock, via a pivot that is screwed to the inside of the door. Except the screw has come loose, so the
knob is jammed. I tighten that but the lock is still kinda sticky, so I spray on some grease in little blobs that can run down between the moving
parts. I try opening and shutting the door, locked and unlocked, and it seems to be fine. I leave the door car etc off for now, and get on with
the seat.
The seat back hooks onto a couple of hooks, so I put the parcel shelf into position, then push and punch the seat back into place, then fix it
with the two setscrews in te bottom corners, through the wheelarch.
Then the seat base just fits in, and you punch it back until it slots into place in the floor.
Easiest day so far!
When I come back to the car later, the door is still opening and shutting easily, so I reassemble all of its innards.
 Then there are two clips that screw into the scuttle.
 Each bit of trim slides onto those clips, and has a wee break in the slider that allows it to clip over.
 This photo shows how far each bit of trim has to slide - the masking tape lines up where it clips on, then it has to be slid out and
round into position.
 So that it fits under the corner moulding.
 There’s a longer clip that fits in the centre. I slide that into one side, push them both into position, then the slide the clip back to
join them. Then the whole lot screws through the clip into the scuttle.


