:: Diary - December 2016 ::
:: Thursday, December 1, 2016 ::
I replaced the clock, that only took about 10 minutes, it’s easy when you can get not just your hands but also most of your arm, your
shoulder and your head up behind the dashboard, and no cable ties to skin you alive.
I thought I had a garage space lined up, but there was a delay. I went back to see him, and he promised he would sort
it out, 4 weeks ago. Nada, zilch, nothing.
So the Chevy has been sitting outside since I got it. It’s been rained on, covered in leaves, frozen, frosted - while singing “do you know the way to San
Jose” (which is where it was until June). I need to get it under cover…
There’s no more space available along at the farm, but I was along there the other day to collect my trickle charger, and noticed that the man who shares
the other half of the barn hasn’t got nearly as much stuff as before. So I checked the measurement of the door width, against the width of the car - and
the 57 Bel Air is a lot narrower than the ’59 red one I was looking at originally. That one wouldn’t even fit through the door - but mine will (with about 3
inches on each side, according to published dimensions).
So I spoke to the farm owner, then gave the other guy a call, and he says he has tidied a lot of his stuff out, and is happy if I need the rest of the
space at least over the winter. I think I will sell a car in the spring (probably the Porsche) so that would take me back to needing 2 spaces again -
one here, one along there.
:: Saturday, December 3, 2016 ::
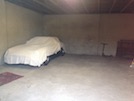 I went along to the farm today, met the other renter, helped him to load some stuff into his van, and shifted the TVR right up against the wall (not
RIGHT against it obviously) and that leaves THIS space available. A Chevy Bel Air parked right beside the TVR comes roughly to where the front wheel
of that little scooter is.
The Chevy is a lot longer though - right forward to the edge of that bit of carpet (which regular readers will recognise, has featured in photos on this
site for donkey’s years, and even in Sprint magazine). So - it fits!
What else… oh yes, I’ve put more antifreeze in the Chevy - there was some in there, but a little bit weak. I also got valve cover gaskets and new bolts
and proper spreaders, plus oil and filter, so that I can service it - I don’t know when it was last done, and there’s only one way to be sure, eh? I also
need to find my ancient unused grease gun - this thing has proper grease nipples on all the suspension and steering joints!
:: Thursday, December 8, 2016 ::
Still haven’t taken the Chevrolet along to the farm. I’m in a dilemma. There are two considerations:
It’s been f-f-f-f-freezing for days, minus 5 and minus 6 some nights, so the roads are saltier than a merchant sailor’s language. So you don’t want to
move a car on salty roads, right?
But sitting in the drive, it’s getting covered in leaves and pine needles, it’s getting rained on and frosted up, and some of the chrome is already
showing signs of suffering.
So, what do you do?
Well, the temperature has been a bit higher for the last 3 days (about 20 degrees higher) so our poor wee skint cooncil won’t be using up their precious
supply of salt, especially since it has also been raining, and that just washes it away.
So today, on the third day of no salt, and with no rain and relatively dry roads, I decide to make a dash for it.
First, though, I hose off all the leaves and muck, and make sure that the drain holes in the boot recess etc aren’t blocked. Then I start it up for the
first time in days, and drive it along to the farm.
Getting it into the garage is a bit more complicated than I hoped - John is helping by waving his hand, but I can’t really see him because the windows
are steaming up with the exertion of all this wheel-twirling. In fact, I can’t see a bloody thing… but with the windows open so I can see the mirrors, it
all gets a bit easier, and the car fits through the door and into the space exactly where I measured it would.
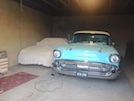 So, it’s in, as you can see. The TVR is absolutely tiny by comparison! I need to buy 4 sheets and sew them together to make a cover… or maybe just buy a
mainsail off HMS victory or something.
I connect up my wee trickle charger, just to keep the battery topped up - the battery is only little and it has a lot to turn over!
Then I have to walk 4 miles back home - but I’m happy, the car is under cover and I can get started on servicing it and sprucing it up a bit.
At some point, I’ll swap the Porsche and bring the TVR back to the house so that I can sort out various wee niggles on that - some of them have been
there since I got it though, so there’s no urgency!
I also need to sort out the pedal car…
:: Saturday, December 10, 2016 ::
So - we have a Chevy in the garage - time to get started! I load up the car with all of the stuff I think I'll need, and head along to the barn. Bet
I've forgotten something!
First job is to check the antifreeze mix again, now that's had a wee run, and a chance to mix it through the system. It's better, but still a little
bit weak. OK, but not quite the level of protection I would like. Thing is, I can't put any more neat antifreeze in, unless I drain some out - a job
for another day!
So, let's see - where do we start?
I decide to start with that scene from "Christine" where you stand in front of your wreck and say "Ok, show me...".
I give it a good chance, I wait nearly 20 minutes. Nothing happens.
A more conventional approach is required.
As far as I can see, it doesn't need anything too radical. Yes, I could pull it to bits and do a full restoration, but that's not the plan. All I want
to do is get it looking clean and shiny.
So I start by covering it in nice new giant-size dust sheets that I bought this morning, so that the dust from whatever bit I'm working on, doesn't
settle all over the bits I've already done. None of this "fitted covers" pish - just two fairly thin 12 foot square cotton sheets, with knots in the
outside corners to hold them snug. Then I start with the "ring of confidence" (and if you remember that advert you're older than you pretend to be),
and start to polish up the chrome front bumper and grill.
Jees, there's acres of chrome on this thing... but it's in pretty good nick, and aside from a few little bits that need more concentrated attention,
it's pretty easy - polish on with one cloth, wipe off with another, and then a final buff up with a third cloth that doesn't really get polish on it
at all.
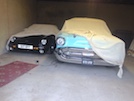 Looks impressive!
Next, I decide to start on the under-bonnet appearance. Yes, I know it's a bit random, but I like to see progress in lots of little areas instead of
working yourself into a stupor on one thing, with no progress on others. So I remove the air filter covers and the paper filters inside, and then clean
up the carburettors with carb cleaner, with a toothbrush for the tougher stains.
Then I polish the two chrome filter covers, just to remove various marks that detract from their appearance. They are the first thing you see when you
open the bonnet, so their appearance is important!
The other things you see are the valve covers, which are bare alloy, and therefore oxidised. I can't really polish them on the car, and I don't want
to take them off until I'm ready to service the car and adjust the valves at the same time.
They are held on with a sundry collection of different cross-head screws and bolts of different sizes. I've bought those wing-nut cover bolts that you
sometimes see on Yank cars, so I'll replace the miscellaneous collection with those, which will make getting the covers off a lot easier, later.
One side is easy. The other side, though, has two bolts with heads of an unusual size (remember these are A/F bolts not metric!) and I don't have a
socket the right size, not here anyway. I'll need to put that off until I can bring the right socket.
So instead, I'll clean up the whitewall tyres. I mixed up some stuff to clean them (just a strong washing up liquid solution in a spray bottle) but
I can't find it... another plan thwarted!
By this time, I've been here for a few hours, including talking to the whole family of the barn owner, who cam up one at a time for a blether and to
see the car. It's getting dark so I'm going home!
:: Sunday, December 11, 2016 ::
I fire up the air compressor and blow through the air filter elements from the inside outwards. I was planning to buy new elements but I can't find
a seller in the UK. Not yet, anyway. And the postage from the old USA is a bit high.
Then I load up the car again, remembering to pack a selection of little sockets and a variety of grips and handles to get to the bolts, because access
is impeded by the enormous servo.
I still can't find the mix for cleaning the tyres, then as I am locking the garage I see it sitting on a box beside the door, where I put it so that
I wouldn't forget it yesterday. That worked a treat, didn't it?
So, back to the barn, where I start by replacing the remaining valve cover bolts. They all tighten by hand, so spanner access past the servo isn't an
issue any more.
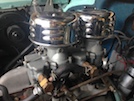 Then I refit the air filters and covers. There now, that looks better already!
Now on to the tyres. Spray with soapy solution and scrub with an old dish scourer - you know, those yellow foam things with the green pad on one side.
You don't know? Ask your mum to give you an old one.
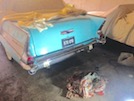 So it's back to the chrome, the rear bumper this time. I push the car forward a bit , away from the wall, and light up proceedings with my work lamp.
After another hand-numbing polishing session, it looks not too bad. The rear nearside (driver side) bit isn't in as good nick as the rest (I noticed
that before I bought it) but a bit of concentrated polishing results in a big improvement.
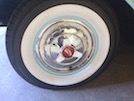 Then I work my way around the hubcaps, which come up very nice - only the front right hand one has pitting on the little "spinner" in the middle. Not
a major fault, and in any case, I have 2 spares I can fit if I want it to look better (but mainly, if I lose one altogether!)
I also polish the rear number plate surround and the rear badge, and the back edge of the fins, before I push the car back against the wall.
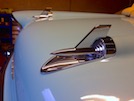 Then I polish these bonnet ornaments, which are perfectly positioned, and the perfect shape, to nail through any pedestrians and hold them in place
before they can bounce up and break the windscreen. Clever, eh?
:: Thursday, December 15, 2016 ::
No progress on the car itself, although I’ve been buying bits and pieces like paints and polishes, ready for my next visit.
What I have been doing, is fixing something on the website that nobody else probably even noticed. The original tvrgit website developed a wee error
somehow that meant that although the page background is white, there were bits that came up in a pale yellow - for example if you clicked on a photo,
it came up on this strange yellow background. I searched for the problem but just couldn’t figure it out.
Well, when this website came up wth the same problem I thought I should investigate further, so I started with a blank page and basically copied in
html code line-by-line until the background went yellow, so I could at least narrow it down to a single line of code. Turns out that I had an extra
letter “f” in the background colour code - 7 “f”s instead of six. Not easy to spot in a proof-reading check!
So, with that fixed on both sites, I’m a happy pixie.
I have no idea how I wrote that TVR web site in the first place - copying it and changing the format to make this one, is the hardest thing I've
done for years... Ive been at it for days!
I’ve also sorted out all the spam and shit that was filling up the tvrgit at tvrgit.com mail box, so I’ve been able to make that active again!
:: Thursday, December 15, 2016 ::
Another exciting day at the garage!
Well, that maybe over-emphasises the “exciting” bit, and underplays the “talking to John about all sorts of shit” element of the day.
After an hour and a bit (i.e. most of another hour) I finally get started.
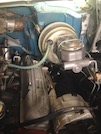 First job is to clean up the brake master cylinder, mainly by painting it in a metallic grey. I also take the lid off the reservoir and polish it.
I can’t polish the servo though because then I’ll get polish dust all over the wet paint, so that will have to wait.
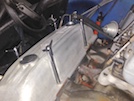 Here’s the hand-tightened extended wing nuts that hold the valve covers on, that I was talking about the other day.
Then I set about cleaning up the paintwork with detailer spray and 2 cloths - that takes ages, there’s a lot of surface area! By the time I am finished
that, it looks gleaming! Ready for polish.
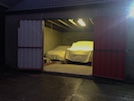 Not today, though. I’ve spent so much time blethering, that it’s getting dark. So it’s covers back on, and tucked into beddy-baws until another day..
:: Saturday, December 17, 2016 ::
I’ve decided that I need to spend less time doing shit just to keep other people happy, and more time doing things I like to do. Unfortunately she wrote
back saying she wasn’t available for the things I had in mind, so that (and the interdict) puts paid to that idea.
So instead, I spend another few hours along at the farm playing with my Chevrolet.
The brake master cylinder has come up really good, so today I’m going to start by painting the water pump, which has recently been replaced, and now has
a fine later of surface rust, which you see as soon as you open the bonnet. Chevrolet, at that time, painted their engines in a shade of orange, and
I’ve bought a tin of engine enamel in “Chevrolet Orange” to match.
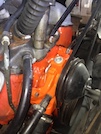 It’s fiddly, but I manage to get more paint on the pump than on any surrounding parts, so that has to go down as some sort of success. I also touch up
various wee chips in the existing paint on the block and heads.
Then I go on to polishing the bodywork. There’s a lot of bodywork, and I only get about half-way round (but including the roof!) before I decide I’ve
had enough. That’s another couple of hours happily whiled away!
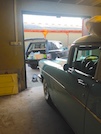 Gratuitous picture of a shiny Chevrolet and a Range Rover tailgate being used as a workbench.
Next jobs are to finish polishing the main areas of paintwork, some of the little “details” bits like window pillars etc, polish up the servo if possible,
and see if I can figure out a way to connect the “kick down” cable from the autobox, to the throttle linkage.
:: Wednesday, December 28, 2016 ::
I haven't been along to the garage for a week - the weather has been absolutely crap, and I've been busy with out her stuff (not mostly work, for a
change). But today, I have a wee trip along.
First I try to fit the little U-clamp I bought last Sunday to the throttle linkage - although it fits, I realise that it's not going to work unless I
have a long end and a short one. Back to the drawing board!
While I'm in that general area, I decide to remove the valve covers for refurbishment. I haven't decided what I'm going to do with them yet - paint or
polish, depends how they come up. The natty wing-nut clamp bolts all come out easily, but the left hand cover won't come off because the alternator is
in the way.
So I loosen the alternator clamp bolts (9/16ths), remove the fan belt, swing the alternator out of the way and that lets me get the cover off. The other
side is easy. Both are fixed down with the expensive rubber gaskets so I should be able to re-use them.
Then I polish up the brake servo, it's not great but it's ok. Then I clean up the wiper motor and polish the housing.
I was going to paint the inlet manifold, but again, that depends on how the valve covers come up, so I need to do those first.
I remove the oil filler tube and cap from the inlet manifold, and load everything in the car, back to the house.
First I try an aluminium cleaner on the valve covers. No noticeable difference.
OK, so we'll fire up the bead blaster. After manoeuvring the thing around inside the blast cabinet for bleeding ages, I take it out. It's better, but
still a bit shabby.
Right. At least that's resulted in a good surface for painting. So I retrieve the can of "chrome plate" paint that I used on a couple of small bits on
the Porsche engine bay. Now it doesn't looking anything like chrome, but it does look a lot like polished alloy.
After a couple of coats, they don't look too bad at all! Sorry, no photos because this was all going on in a darkening garage.
Then I degrease and clean up the oil filler tube, and paint that in a satin black.
So with the valve covers in shiny metal finish, and the engine and heads in standard orange, what colour for the inlet manifolds? Not daddy bear's
silver paint - too bright. Not mummy bear's grey paint (as it is just now) - too dull. I think baby bear's orange paint will be just right!
That's the next job then!
I've also been reading up about refurbishing the steering wheel - the rest of the interior is good but that wheel is mingin' as we say here in Scotland.
It’s the same colour as the car, but badly chipped, and with cracks on the rim and the spokes - they need to be ground out, filled out with epoxy, then
shaped, sanded, and repainted. The only tricky bit in all of that is getting paint mixed in the right colour. One thing at a time though - engine bay /
bodywork polishing first!
:: Friday, December 30, 2016 ::
Back to the barn, and the Chevy’s engine bay. I’m going to paint the inlet manifold, so first I remove the rubber vacuum tube to the servo. Then I decide
to also swing the alternator further out of the way so that I can paint in behind the bracket, where it clamps to the inlet manifold. It looks as though
the alternator connection from the battery will brush against the brake pipes as it swings downwards, though, so to minimise any risk of a sparky and
crispy doom (for me or the car), I disconnect the battery first. With the clamp bolt removed, the alternator swings down, and just touches the brake
pipes on the way past. I wedge a thick cloth pad between the connector and the pipes, in case some total idiot reconnects the battery without thinking.
One of the advantages of age is that you at least realise how stupid and forgetful you are. I suppose the next stage is to forget how stupid and forgetful
you are, but at least, for the moment, I’m all too aware.
I have a combination of a large brush (when I say large I mean an artists brush less than half an inch across), a smaller artists brush for the tricky
bits, and a disposable paint pad for the impossible to reach bits. All in all, it takes me the best part of 2 hours to work my way round from the rear
of the manifold on the driver side, across the front, and back to the rear on the passenger side - it’s very tricky and access is severely limited.
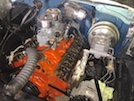 By the time I have finished, it looks like this - a big improvement! Bits of it could do with another coat, but most of it is fine. I have still to paint
the thermostat housing.
I’ve been looking for white exhaust paint for those manifolds, but I can only get spray cans - which as you can see, would result in paint everywhere.
I can’t find brush-on very high temp paint in white.
I don’t have time to do any more though - I have a lunch meeting and I need to get cleaned up first, I’m honking of paint and thinner (and various other
things that I needn’t mention) and it’s sadly unlikely that she’ll ask me to “paint me like your French girls, Jack”.
I’m not coming back in the afternoon either because knocking on the man’s door twice in one day to get the barn key just isn’t good form.
:: Saturday, December 31, 2016 ::
I have various things to do today, but it’s raining. It’s dry in the barn though, so I decide to get a bit more done.
I give the inlet manifold a second coat, using half my brain, while the other half is engaged in a discussion with the owner of the farm about our
respective experiences of driving hooliganism in the 1970s, involving an assortment of cars including Mk1 Cortinas, Escorts, Capris, Minis, Imps and
in his case, a Renault 5 Gordini, the lucky bastard. Then he goes off and comes back with photos of his wide-arched custom Anglia… Jees, I though John
was bad… but I’m no better, I’m enjoying the chat.
Then I paint the thermostat housing, and then replace the oil filler tube and cap, and the throttle return spring, which I’ve just noticed is the
opposite way round from how it was - but checking on line, some engines have it one way, and some the other, for no consistent reason that I can see.
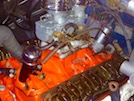 So now it looks like this. I was going to put the rocker covers back on, but I left the gaskets back at the house. It’s a pain in the arse, this…
 I went along to the farm today, met the other renter, helped him to load some stuff into his van, and shifted the TVR right up against the wall (not
RIGHT against it obviously) and that leaves THIS space available. A Chevy Bel Air parked right beside the TVR comes roughly to where the front wheel
of that little scooter is.


