:: Diary - September 2021 ::
:: Thursday 2 September, 2021 ::
Well, dear readers, what do you know? My Chevrolet isn't what I thought it was... but more of that later!
First, the immediate problem - getting the inlet manifold off. It's stuck down at the front and back, with more silicone than Katie Price's
cleavage, so I need to split that first - the silicone is preventing me getting a lever into the join. I get a stanley knife into the join,
and cut along the top and bottom of the silicone, That lets me pull a strip out, and get a wee pinch bar in - lever against the top of the
water pump, and out it comes!
It's cast iron and it's effing heavy - I nearly do myself an injury lifting it out!
Then I undo all the valve rockers and put them all in separate bags, and also carefully store the pushrods in order using the old "8 marked
holes in a cardboard box" method.
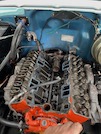 So that gets me to here!
The plan was to take the exhaust manifolds off with the head, but now I've suddenly realised that half of the head bolts are underneath the
manifold, so it'll have to come off first! So I jack up the car far enough to get my carcass underneath, and disconnect the downpipes. It's
fiddly, in limited space, but they all undo without too much drama (and no breakages!)
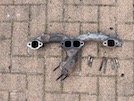 I take both manifolds off because I'm going to paint them.
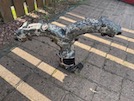 The right-hand one has a wee valve attached, that seems to be heat-sensitive. It's apparently a "heat riser valve" and is supposed to direct
hot exhaust gas under the carburettor to warm it up quicker. I suspect it's probably as much use as a chocolate kettle but that's what it is.
Strangely, there's no sign of ay exhaust manifold gaskets - just metal to metal contact, no sealer or anything. Again, though, the bolts all
come out with none breaking - are you listening Ford and TVR?
Righty-ho. Time to take off the cylinder head bolts. I undo them all slightly, starting from the ends and working inwards in a kind of spiral
(the reverse of the tightening sequence). Just crack them all loose on the first circuit, then a wee bit more, before finally taking them all
out. One of the bolts at the back wasn't quite as tight as all the rest - tight, but not the same.
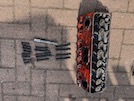 They are all different lengths so I lay them all out in order, so that I can see where they go back.
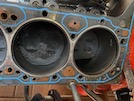 With the head off, I examine the gasket still stuck to the block. Theres evidence of a wee oil leak around a channel where the yellow arrow is.
There's also a lot of carbon on the top edge of the bore in that quarter.
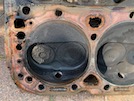 Looking at the underside of the head, it's a wee bit more obvious...
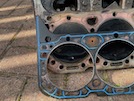 and when you see the underside of the gasket, you can see where oil has been leaking past the gasket into the cylinder.
So I think that a combination of the oil being under pressure, and the vacuum in the cylinder when it's drawing in fuel / air, is maybe also
drawing oil into that cylinder past the gasket.
I also think that the head bolt that wasn't as tight, was right here.
Hopefully, this is the problem, but I decide to check the valves and guides anyway.
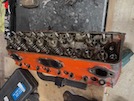 Using a valve compressor (a very old one that I bought in the 1970s!) I remove the exhaust and inlet valves, springs and seals in that cylinder,
making sure to bag them all separately so that they'll go back together in the right order.
I turn each valve over and try it in its valve guide upside-down, so that I can feel for any side play - there is a tough, but not much. I decide
to take out one of the valves in the next cylinder, which clearly isn't leaking, for comparison. It feels exactly the same, and they also feel
the same when I swap them over temporarily.
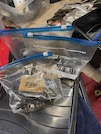 Right - everything back in its correct bag!
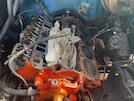 Then I scrape the old gaskets off the inlet manifold and the heads with a stanley knife blade, making sure than none of the shit falls down
into the valve gear.
That's enough for today, but remember at the top of this entry, when I said that my Chevrolet isn't what I thought it was? Well, as Ive been
dismantling, I have uncovered various casting numbers on the block , the inlet manifold and on the cylinder heads. A bit of online research
has show that all of those numbers point to this not being a 350 cubic inch engine (5.7 litres) as shown on the registration document etc,
but a 327 (5.3 litres). The castings are all consistent with a 1962 to 1965 327 Corvette, 275 bhp automatic with either a Carter or Rochester
4-barrel carb.
However, the only difference between a 350 engine and a 327 is the piston stroke (they have a different crankshaft, conrods and pistons). So
there might be a possibility that it has been rebut with those bigger parts, into a 327 block. Only one way to be sure, so
I measure the piston stroke by turning the engine over at the pulley (making sure to turn it twice so that the camshaft is back where it
started for ignition timing later!). It's 3.25 inches - the stroke of a 327. A 350 has a 3.48 inch stroke.
So I'm going to have to change my wee display cards for the Sporting Bears etc, but at least now I know that I only have a puny wee 327ci
engine and not the 350ci of a real man. I'll get over it.
There's no pronounced "lip" at the top of any of the bores (except the oily one, but that's carbon build-up at the top, not wear further
down). So the engine doesn't seem to need a full rebuild, I'm going to clean up the cylinder head and the valve, and put it all back together
again with new gaskets. I'm not even going to take the other cylinder head off - the plugs were all clean so I'm sure it's fine.
When I go indoors, I order a tope end gasket set, some RTV sealer, a new carb to manifold gasket, and some VHT paint for the manifolds.
I was also thinking about changing the carburettors, and whanging on an Edelbrock or Holley instead of the twin Stromberg 97s that I have.
There's nothing wrong with them though, except that the linkage keeps coming loose on the front spindle, so it only opens the rear carb.
I would prefer to fix that (although an Edelbrock with a big chrome air cleaner would look awfully nice!).
:: Sunday 5 September, 2021 ::
Well, the gaskets etc that I ordered haven't arrived yet, so I've had to content myself with just tidying things up and getting them ready
for reassembly.
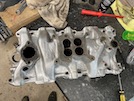 The inlet manifold needs a good clean up, and a wee paint in the bits that you can't reach when it's on the car and the carbs etc are all
fitted. It comes up right nice!
Next, I clean up the inlet and exhaust valves for No 7 cylinder with a wire brush to get all the carbon off, then I spray the other combustion
chambers with carb cleaner to clean off most of the soot.
Then I refit the 3 valves that I took out, again using the trusty old valve spring compressor. I refit the umbrellas, springs and keepers etc
with new oil seals.
Then I move on to cleaning up the head bolts, some of which seem to have silicon sealer on the threads, Since the head bolts go straight into
the water jacket, that sealer is recommended to prevent water leaking up the threads.
Same goes for the inlet manifold bolts, although they don't get water on them, they go into the valley between the cylinders and will leak oil
if you're not careful. Those need sealer on the threads too!
I clamp each bolt in turn into a vice and give them a good wire brush, until the threads are clean, then I put them all back in their respective
identification bags for re-installing later.
Then the exhaust bolts - they have the remains of anti-seize compound in the threads, so they need a good wire brushing too.
After that, I check to see if I have solid or hydraulic valve lifters (tappets to us what speak proper English). I lift one out to have a look.
ID is simple - hydraulic lifters have a wire circlip thing in the end, to hold the piston in. Solid ones don't - because they are solid so don't
have internal moving parts! Mine are hydraulic - this is important for adjusting them later (when it's too late to tell what you've got, without
taking the engine to bits again).
I also check what type of carburettors I have - they are the old original Stromberg 48s, which have a capacity of around 185 cubic feet per
minute - so 2 of them gets around 370 cfm of air into the engine. That might be restrictive - a Holley or Edelbrock is around 500 to 600 cam, and
if you can't get enough air in, you can't mix in enough petrol, so you don't get enough oomph! That Edelbrock and big air cleaner is sounding
even more attractive! One thing at a time though - let's get it back together and working before we change anything!
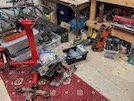 Here's a gratuitous photo of a garage with a pile of Chevy bits scattered around it. The intake manifold is up on the bench, the big clear box
contains all of the bits I took off on day 1, including the carbs, alternator, fan, belt, plug leads, hoses etc. The wee black box contains the
distributor and various other bits from day 2, and the bags on the other box nearer to us are for the valve rockers for each valve, and you can
see the pushrods in holes in the wee cardboard box.
The exhaust manifolds are on the floor waiting for a paint delivery, the cylinder head is waiting for delivery of gaskets. The green ammo box
is a selection of old A/F and Whitworth spanners that are (even) older than me. The wee white box is electrical testers and connectors etc.
:: Tuesday 7 September, 2021 ::
Still no sign of the gaskets, so I can't start putting the engine back together. The exhaust paint did arrive, however, so there's a wee job
for today.
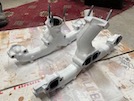 Bit of a wire brush, then on with the spraying! This is what they look like after the first coat. After about an hour, I give them a second
coat, which is a bit more even.
Why white? Well, I read that exhaust manifolds in the 1950s were originally white - mine certainly were (although a lot of the "white" had
worn or burnt away).
After that, I just faff around in the garage tidying up various wee bits and pieces, including scarping the other gasket off the thermostat
housing, etc.
I was thinking of buying new head bolts and manifold bolts - some makers advise that you shouldn't re-use head bolts after their first
tightening (and stretching). As far as I can see, though, these should be ok as long as the threads are clean. Another factor is that new
ones are over £100 a set! Yup, they'll do all right.
The inlet manifold bolts are a different matter - all the sets that I see, have all 12 bolts the same size. I have 9 short ones and 3 longer
ones. Now, as I said yesterday, those go into the "valley" between the cylinders, where the pushrods are jumping up and down. Some of these
bolts are awfully close to those pushrods! I decide to order a new set of shorter bolts (with smaller heads so they are easier to tighten!).
While I am looking at those, I accidentally stumble across some carburettors on the same website. Nice shiny Edelbrock ones. And adapters
for my manifold. And big shiny air cleaners. Might as well order those while I'm here, eh?
:: Friday 10 September, 2021 ::
Well, the last of the new parts arrived yesterday - the gasket set - so I can make a start at putting all these bits back together.
First I clean the cylinder head and block with wd40 on a rag, to take off the last residues etc, paying particular attention to the edges of
the combustion chambers, then I locate the gasket on the dowels on the block, and replace cylinder head. The bolts are supposed to be
tightened to 65 lb-ft in two stages, but I get to around 20 and decide that’s enough for a first pass. Then round the sequence (17 bolts!) at
around 40, then finally to 65, and round again to make sure everything is evenly in place.
Then I can replace the pushrods in the right order, and then replace the rockers. There’s an easy way to adjust the valve clearance on a
small block V8. The engine is still on TDC for cylinder 1, firing stroke, and without turning the engine, you adjust the inlet valves on
cylinders 1, 2, 5 and 7, and the exhaust valves on 1, 3, 4 and 8. Then turn the engine one full turn, back to the timing mark, so cylinder 6
is on TDC, and again without turning the engine, you adjust the inlet valves on cylinders 3, 4, 6 and 8, and the exhaust valves on 2, 5, 6 and
7. And that's it!
You adjust them by nipping them while twiddling the pushrod - when the pushrod sticks, stop and back off slightly till you can just turn it.
Then turn it down to preload the hydraulic lifter. Some say one turn, some say 1/4 turn or 1/2 turn. I settle on 1/2 turn preload.
Ok with that done, next step is the inlet manifold. This is where it can all go wrong! First, smear a little RTV sealer round the water
ports at the ends and in the centre, and stick the gasket down, then another smear of sealer around the water ports in the gasket. Then,
and this is the tricky bit, I put a 1/4 inch bead of sealer along the front and back edges of the engine block, and leave all that to set
for 15 minutes or so.
Now, the manifold is cast iron and weighs a ton, and is hard to grip when your arms are at full stretch over a Chevrolet’s from wing, sorry
fender. So I make a “handle” out of a couple of turns of rope between the vacuum t-piece at the rear and the water inlet for the heater at
the front, and that lets me lower the manifold into place without dislodging the gaskets or the sealer. Then I torque it down carefully in
the right sequence, again in 3 stages.
Next, is replacing the distributor. There is a key in the bottom of the distributor that fits a slot in the oil pump drive, and “the book”
says to line that up with a big long screwdriver before you start. That turns out to be a total faff, so I decide to line up the rotor arm
with the No1 mark on the distributor, and chuck it in anyway. It turns as you lower it as is meshes in the skew gear on the cam, so you set
it just under 2 inches before the mark, and lower it in. It obviously won’t drop the last bit until it engages in the oil pump, but the
distributor is engaged in the cam gear, so they will now turn together as you turn the engine until the distributor drops into that oil
pump drive. When it does, keep turning the engine over till the timing mark lines up with No1 on firing stroke, make sure the rotor arm
still points at no 1 plug lead, and clamp it down. That will at least get it to start, then you can do fine adjustments later!
Then I replace the pcv valve and reconnect the oil sender wire
Next step is to replace the exhaust manifolds, with new gaskets. It’s fiddly, but I get them both bolted up. I’ll do the downpipes later.
Then there a list of wee jobs:
Temperature gauge sender with ptfe tape on the threads
replace thermostat and hose
reconnect water hoses
heater hose
Replace and connect the coil
Replace cooling fan
Replace alternator and belt
Replace distributor cap / leads
So far so good. The next step is to replace the carbs, and this is where it all starts to go wrong…
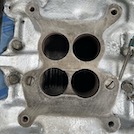 This photo shows the carb flange on my manifold - it’s obviously designed for a 4-barrel original carb. So I ordered a 4-barrel gasket -
makes sense eh?
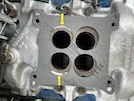 But here’s that new gasket on my manifold - you can see that it’s nowhere near the same. The yellow arrows show huge gaps (around 1/4 inch)
on each side that are going to draw in air. Lots of air…
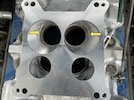 A quick check shows that the adapter plate and gaskets that I bought for my new bigger carb, is exactly the same, so that’s not going to fit
either…
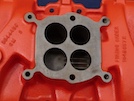 This a photo of another 327 Corvette manifold - the bores are further apart and there's a lot more meat on the flange around them. THAT's
what my adapter is meant to fit! A bit of research shows that they changed carbs in 1965 and mine is designed to fit the earlier Rochester
or Carter carb, not the "spread bore" that the adapter fits.
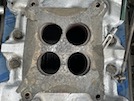 This is, as they say, a bit of a bugger. I go and retrieve my old gasket which has seen better days, but might still seal. Maybe.
So I put it on and bolt down the carbs, and reconnect the fuel supply and the throttle linkage before replacing the air cleaners.
Then I re-connect the vacuum hose that goes down to the auto box, and also replace the brake servo hose.
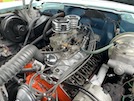 So that gets me to here...
Time to refill the radiator and check for leaks, then re-connect the temperature gauge sender.
Last task for today is to replace the rocker covers.
:: Saturday 11 September, 2021 ::
Ok, we’re nearly finished. First I jack up the car and get under, to connect these exhaust downpipes. The right hand one is easy, slip that
strange heat-controlled flap on with a gasket, then tighten up the nuts.
The left one won’t go on - the exhaust is about an inch too long to go over the end of the bolts. Bugger again! I have to take the manifold
back off to lift it to fit it loosely over those bolts, then bolt it back up to the cylinder head before tightening the downpipes.
Then I replace the spark plugs and connect up the leads, and then at last the final step - re-connect the battery!
With a wee bit of help from a jump start, it burst into life, albeit running like a duff tractor. I loosen the distributor and turn it slightly,
till the engine speeds up to its max, then retard it just a wee bit. Now it’s running a lot smoother!
I switch it off so that I can connect up my timing light, but then when I start it again it’s whistling like my granny’s singing kettle -
obviously sucking in air somewhere! A lot of air!
This howling racket draws the attention of my neighbour who comes over for a look. With a couple of cloths, we figure out that the whistling
is coming from the carb flange and that re-used gasket!
I decide to make a gasket from the side of a cardboard box. I trace the outline of the old gasket onto the cardboard, and cut it out. Then I
punch out the bolt hole positions and bolt it loosely in place on the manifold flange, and cut out the ports by tapping round the edge with
a wee ball pein hammer, just like my daddy taught me 50 years ago!
Then with a wee smear of sealer on the two flanges, I bolt it back up and reconnect the fuel supply and throttle. Start it again and it’s running
like a sewing machine! And no whistling!
I have a wee drive and it all seems good. Obviously I’ll have to see if the oily spark plug problem comes back, but I would call this a success!
:: Tuesday 14 September, 2021 ::
With the engine rebuilt and going again, it's time to look more seriously at how I'm going to fit this new carburettor. The carb-to-manifold
adapter that I bought, doesn't fit. I could buy and fit a whole new aluminium intake manifold, but I want to try to find the right adapter. After
a bit more research of carburettors fitted to 1960s Chevys, I'm convinced that my manifold is designed to fit a Carter WCFB carb. The alternative,
which could be a Rochester, looks awfully similar but has 2 small bores and 2 large bores: mine are all the same.
I can't find those adapters in the UK, but there is a site in the USA that sells them. I don't want to order the wrong one, or pay the shipping
and customs for 2, just to throw one away, so I decided on Saturday to order a Carter gasket from a UK site for around a fiver, and compare it
with the manifold.
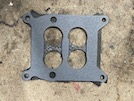 Well it arrived today, and this photo shows it sitting on top of the old gasket that I took off. It looks good to me!
So I go on the US site and order an adapter for a Carter manifold, thinking it's a lot more expensive, before I remember that the price is in
dollars, and the whole cost, including shipping, is less than I paid for the "wrong" one that I bought in the UK. Mind, that doesn't include
the customs charge which can sometimes be a surprise (as in surprisingly low or surprisingly high!).
Back to twiddling thumbs until it arrives!
:: Thursday 23 September, 2021 ::
Well, it’s going! Fitting this carb has been a nightmare of collecting wee parts to hold it all together, but at last, it's going!.
The adapter plate arrived from the USA on Saturday. Yes it has the right openings on each side, but it is supposed to be used to screw upwards
into a Carter carb (on the top) and then mount all of that to a standard manifold (on the bottom). I have to fit it upside down, bolting the
whole thing down with the manifold studs - which aren’t long enough to go through both the adapter and the carb flange. So now I have to order
new longer carb studs…
Meanwhile I place the carb in position and try to fit the throttle linkage, but the standard one is too long. So I order a double-ball joint
adjustable linkage…
All of that arrives on Tuesday, so I fit the long studs, then the carb and adapter plate with the right gaskets, and bolt it all down.
Then I make up a fuel line to connect from the existing hard line to the carb.
Next job is to wire up the electric choke. The earth is easy, short length of wire to a round connector under the nearest carb bolt. The supply
is a bit more trickier. I find a spare ignition-controlled connector on the fuse box, and run a cable from there, above the footwell and through
the bulkhead, then follow existing wiring over the distributor and down beside the gearbox filler tube - then forward under the carb to the
supply terminal. Pop in a suitable old-style glass fuse and it’s ready!
There’s a vacuum connector in the back of the carb that needs a screw-in plug, and three vacuum connections to the front - a big one for connecting
a brake servo etc, and two smaller ones for “manifold vacuum” and “timed vacuum”. I put blanking caps on the first 2, then run a vacuum advance
hose from the timed vacuum connector to the distributor.
That only leaves the throttle connection! I find that the ball-ended connector that I ordered is around 1/4 inch too short, even at full length,
so it holds the throttle open slightly. I order a new length of M5 threaded rod from Toolstation, and go to collect it. When I get home, it turns
out that they have given me M6 rod, that was in the wrong shelf, so after a quick trip back to exchange it, we’re ready to cut it to length and
fit it so that the throttle is fully closed when the pedal is released!
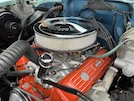 Then I refit the big shiny air cleaner and it’s ready to go!
Despite the fact that there is no fuel in the carb or the fuel line, it starts on the second turn of the key, under its own steam and with no jump
start or booster! This is a new experience!
Time for a test drive! It feels good - nice and smooth and no hiccups. It’s still pulling at 70 mph, so it all seems good!
It’s idling a wee bit fast though, so when I get back I adjust the idle speed screw, then adjust the idle mixture, one side at a time, so that it’s
running just slightly leaner until just before the revs drop.
After the engine has cooled, I decide to check to see if I have achieved the original objective of all this. Do I still have oily plugs? I remove
the plug from No 7 cylinder - the one that would normally be layered in more oil than a vietnamese masseuse after only a few miles, and especially
after the engine has been idling for ages. But no, it's dry, and exactly the right shade of chocolatey-brown that is recommended in all the engine
diagnostic books. I think we can call this a success!
 I take both manifolds off because I'm going to paint them.
 The right-hand one has a wee valve attached, that seems to be heat-sensitive. It's apparently a "heat riser valve" and is supposed to direct
hot exhaust gas under the carburettor to warm it up quicker. I suspect it's probably as much use as a chocolate kettle but that's what it is.
 They are all different lengths so I lay them all out in order, so that I can see where they go back.
 With the head off, I examine the gasket still stuck to the block. Theres evidence of a wee oil leak around a channel where the yellow arrow is.
There's also a lot of carbon on the top edge of the bore in that quarter.
 Looking at the underside of the head, it's a wee bit more obvious...
 and when you see the underside of the gasket, you can see where oil has been leaking past the gasket into the cylinder.
 Using a valve compressor (a very old one that I bought in the 1970s!) I remove the exhaust and inlet valves, springs and seals in that cylinder,
making sure to bag them all separately so that they'll go back together in the right order.
 Right - everything back in its correct bag!
 Then I scrape the old gaskets off the inlet manifold and the heads with a stanley knife blade, making sure than none of the shit falls down
into the valve gear.


